
Exploring Animation Curves
Between my recent SwiftUI projects and YouTube content, animations have become a crucial part of my work. So, I've been down a bit of an animation rabbit hole lately...
We'll start with the basics - from linear animations to easing curves - and then we'll dive into creating custom animations from scratch. Whether you're a designer aiming for delightful user experiences or a developer focused on effective animation, this post has you covered.
Linear Animation & Linear Interpolation
At its core, linear interpolation (a.k.a lerp) smoothly transitions between two values over a fixed time, creating a consistent, constant-speed motion. This forms the basis of linear animation where objects move uniformly from A to B.
Let's see what this looks like in code:
startValueis the starting value of the animation (i.e.alpha,x,width, etc.).endValueis the ending value of the animation.progressis a parameter that ranges from [0,1] and represents how much of the animation's duration has elapsed.
func lerp(startValue: CGFloat, endValue: CGFloat, progress: CGFloat) -> CGFloat {
    return startValue + (endValue - startValue) * progress
}
- When
progress = 0,lerpreturnsstartValue. - When
progress,= 1lerpreturnsendValue. - When
0 < progress < 1,lerpreturns a value betweenstartValueandendValueproportional to the elapsed animation duration.
You can use this lerp function to interpolate between any numeric values in your Swift code; position, opacity, colors, etc.
Now, let's use our lerp function to animate a view linearly across the screen:
class LinearAnimationViewController: UIViewController {
    lazy var boxView: UIView = {
        // Create a blue box
        let boxView = UIView(frame: CGRect(x: 0, y: 200, width: 100, height: 100))
        boxView.backgroundColor = UIColor.blue
        view.addSubview(boxView)
        return boxView
    }()

    let animationDuration: TimeInterval = 3.0
    let frameRate: TimeInterval = 1.0 / 60.0 // 60 FPS
    var currentTime: TimeInterval = 0

    var animationTimer: Timer?

    override func viewDidAppear(_ animated: Bool) {
        super.viewDidAppear(animated)

        // Start the animation timer
        animationTimer = Timer.scheduledTimer(timeInterval: frameRate, target: self, selector: #selector(animateBox), userInfo: nil, repeats: true)
    }

    @objc func animateBox() {
        let startValue: CGFloat = 0
        let endValue: CGFloat = self.view.frame.width - 200

        // Calculate interpolated position
        let progress = CGFloat(currentTime / animationDuration)
        let newX = lerp(startValue: startValue, endValue: endValue, progress: progress)
        boxView.frame.origin.x = newX

        // Moves to the next frame
        currentTime += frameRate
        if currentTime > animationDuration {
            animationTimer?.invalidate()
        }
    }

    func lerp(startValue: CGFloat, endValue: CGFloat, progress: CGFloat) -> CGFloat {
        return startValue + (endValue - startValue) * progress
    }
}
I'll omit the setup code in future examples as it remains constant.
While this linear animation works, it's missing something. Not only is it a little boring, but very few things in the real world are linear in nature - usually, the rate of change of most things tends to be non-linear. For example, when you floor the accelerator in your car, in the first moment nothing happens and then the movement happens all at once.
So, in order to make our animations look more natural, we'll need to rely on non-linear animation curves.
Easing Functions
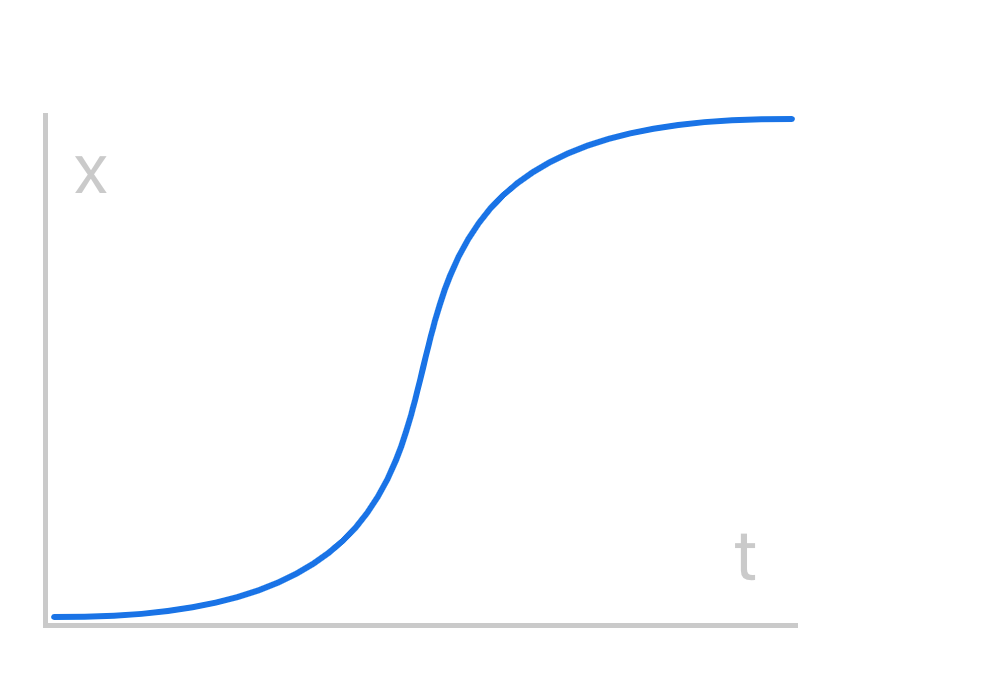
Animation timing functions, often simply called "timing functions" or "easing functions," define how the progress of an animation changes over time.
Timing functions are often depicted as graphs, with time on the horizontal axis and progress or value changes on the vertical axis.
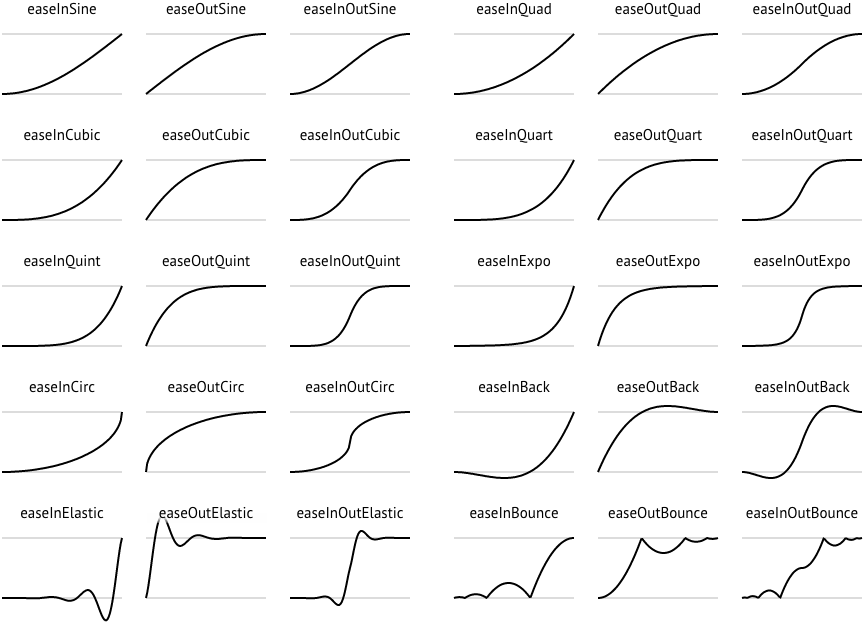
For a more tangible example, consider a car's acceleration. Gentle gas pedal pressure leads to a smooth start, much like an ease-in animation. When you let off the gas before stopping, the gradual slowdown is akin to an ease-out animation.
Ease In
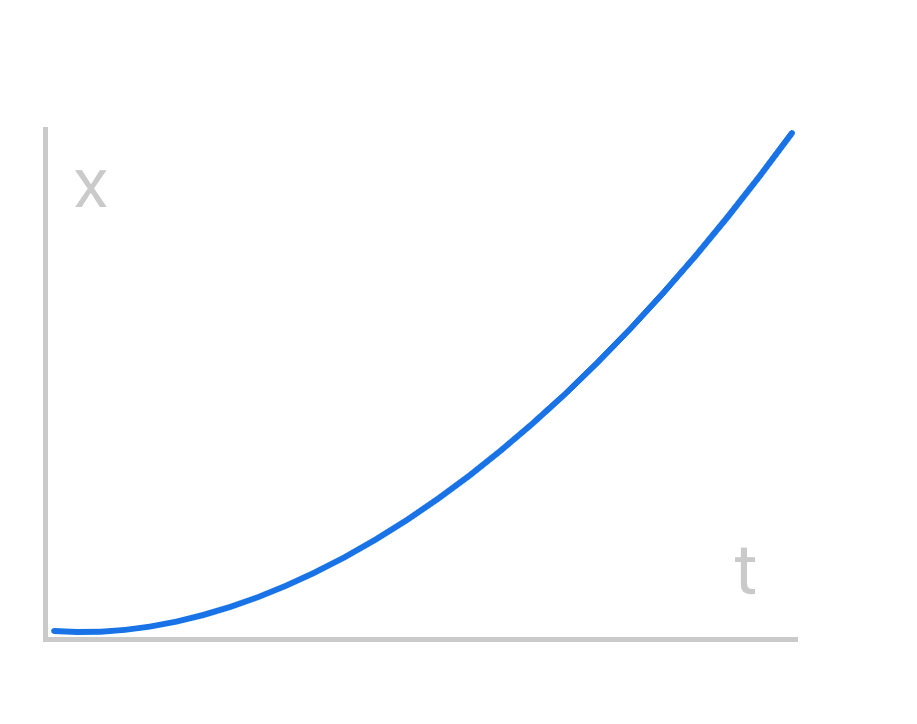
Bothtandxrange from[0, 1].
Easing functions frequently use quadratic or cubic equations because the output grows quickly with minor increases in the input value. This lines up perfectly with our aim of modeling a car's smooth start and then rapid acceleration.
// Calculate interpolated position
let progress = CGFloat(currentTime / animationDuration)
let newX = lerp(startValue: startValue, endValue: endValue, progress: easeIn(progress: progress))
boxView.frame.origin.x = newX

func easeIn(progress: CGFloat) -> CGFloat {
    pow(progress, 2)
}When you use an easing function like easeIn, it takes a single parameter, progress, which represents the fraction of the animation duration that has elapsed and ranges from 0 to 1.
This easing function then transforms this input into an 'eased value' within the same 0 to 1 range. When we combine this 'eased value' with lerp, we can introduce a non-linear element to our interpolation between the start and end values of our animation.
Returning to our car analogy, you can see that gentle start and increased acceleration behavior in this animation.
Ease Out
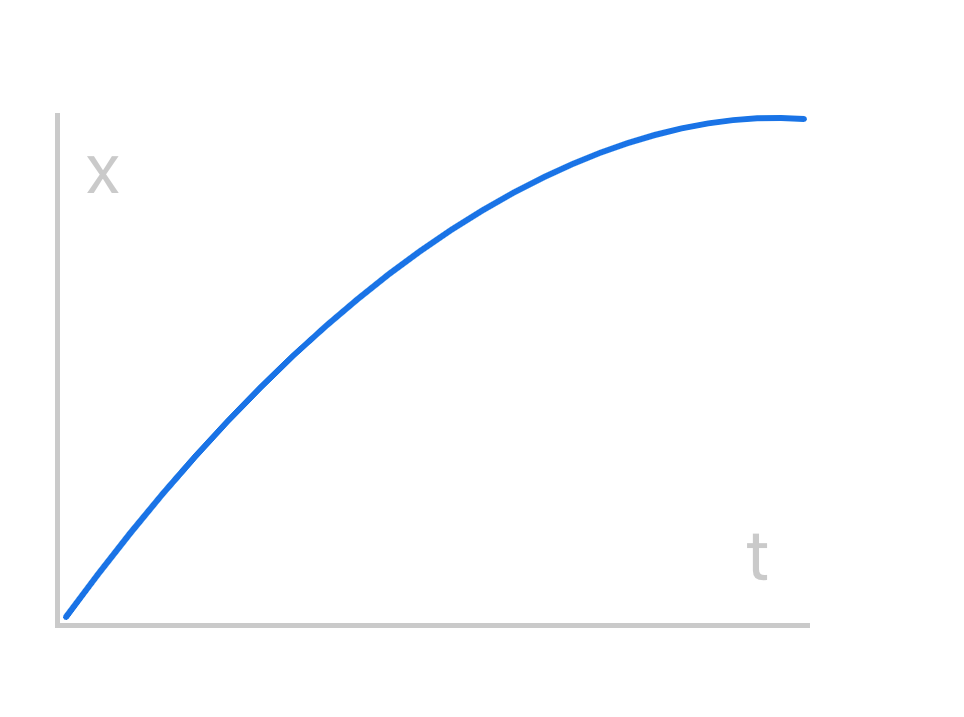
// Calculate interpolated position
let progress = CGFloat(currentTime / animationDuration)
let newX = lerp(startValue: startValue, endValue: endValue, progress: easeOutQuad(progress: progress))
boxView.frame.origin.x = newX

func easeOutQuad(progress: CGFloat) -> CGFloat {
    1 - (1 - progress) * (1 - progress)
}Ease In Elastic

// Calculate interpolated position
let progress = CGFloat(currentTime / animationDuration)
let newX = lerp(startValue: startValue, endValue: endValue, progress: easeInElastic(progress: progress))
boxView.frame.origin.x = newX

func easeInElastic(progress: CGFloat) -> CGFloat {
    guard progress != 0 || progress != 1 else {
        return progress
    }

    return -pow(2, 10 * progress - 10) * sin((progress * 10 - 10.75) * ((2 * CGFloat.pi) / 3))
}
Ease In Out Quint
Check out the piecewise approach in the implementation below.
You're not confined to using a single expression for the entire animation. Instead, you have the freedom to use different formulas for specific time segments, giving you creative control over each part of the animation.
// Calculate interpolated position
let progress = CGFloat(currentTime / animationDuration)
let newX = lerp(startValue: startValue, endValue: endValue, progress: easeInOutQuint(progress: progress))
boxView.frame.origin.x = newX

func easeInOutQuint(progress: CGFloat) -> CGFloat {
    if progress < 0.5 {
        return 16 * pow(progress, 5)
    } else {
        return 1 - pow(-2 * progress + 2, 5) / 2
    }
}
These easing functions aren't limited to just animating positions. We could apply the same approach for scaling, rotation, or opacity animations.
Here's the implementation for an opacity animation using the same easing function:
let startValue: CGFloat = 0
let endValue: CGFloat = 1

// Calculate interpolated position
let progress = CGFloat(currentTime / animationDuration)
let newAlpha = lerp(startValue: startValue, endValue: endValue, progress: easeInOutQuint(progress: progress))
boxView.alpha = newAlphaNo Right Answer
Finding the exact formula for specific easing curves can be challenging since there's no universal equation or standard for all easing functions. Easing functions are often created by designers and developers to achieve specific visual effects or animations, and the exact formula may vary depending on the software or library used.
Animations are a mix of math and artistry. For example, take a look at Lucas Garron's video below, where he builds his own "perfect" easing function from first principles.
To discover the exact formula for a particular easing curve, search for documentation related to the animation library or framework you're using. Some libraries provide mathematical equations for their built-in easing functions.
Additionally, some tools and websites allow you to visualize and generate custom easing curves graphically. While they may not provide the exact formula, they allow you to experiment with different easing curves and export them for use in your animations.
While understanding the math behind easing functions can be valuable for custom animations, predefined easing functions from libraries are often sufficient for achieving the desired visual effects in most projects. This deep dive was driven purely by curiosity.
The implementations above drew significant inspiration from Easings.net. If you're interested in learning more about easing functions, it's a fantastic resource to check out.
Conclusion
From linear ease-ins to quirky custom curves, animations add that extra flair to your user experience. So, the next time you're designing an app or website, don't forget to sprinkle in some animations. With the right timing, creativity, and a dash of experimentation, you'll transform your static screens into an immersive experience.
If you're interested in more articles about iOS Development & Swift, check out my YouTube channel or follow me on Twitter.
And, if you're an indie iOS developer, make sure to check out my newsletter! Each issue features a new indie developer, so feel free to submit your iOS apps.